There are many ways to remove the background from an image in Photoshop. Today, I am going to show you my favorite method: using the lasso tool, layer masks, and a Gaussian blur to soften the edges.
This method probably isn't the best for dealing with fuzzy edges like hair; I'll cover that in another tutorial.
- Estimated time: 10 minutes
- Skill level required: Absolute beginner
I will be assuming you're using a PC running Windows. If you're using a Mac, you can generally substitute Command for Ctrl. I will also be teaching you several keyboard shortcuts, which can be significant time-savers in the long run.
Before and After

Step 1: Open Your Image
Open your image in Photoshop. I'll be using this image of root beer-flavored vodka in Photoshop CS3.

Step 2: Change the Background to a Normal Layer
If the layer says Background in italics, double-click it and select OK in the dialog that appears. Otherwise, you won't have a transparent background.
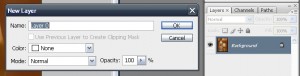
Step 3: Add a Layer Mask
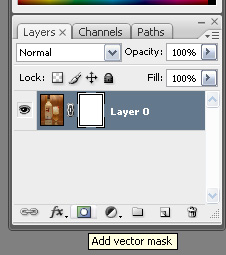
Click the Add Layer Mask button below the Layers panel.
This will allow you to hide parts of the image while retaining the ability to restore them if you remove too much. The Eraser Tool, by comparison, permanently removes pixels.
Step 4: Reset the Colors
Press D to reset the foreground and background colors to black and white, respectively.
This will be important when we start painting on the layer mask:
- Black hides that part of the image, making it transparent.
- White reveals that part of the image, making it opaque.
- Gray produces varying degrees of transparency.
Step 5: Select the Polygonal Lasso Tool
Select the Polygonal Lasso Tool by pressing L.
You may need to click and hold the regular Lasso Tool near the top of the toolbox to open its pop-up menu.
Step 6: Select the Layer Mask
Click the layer mask you added earlier. It is the black-and-white image preview beside Layer 0.
Make sure you are painting on the mask rather than directly on your image.
Step 7: Start Cutting Away the Background
Zoom in by pressing Ctrl+= if necessary, then use the Polygonal Lasso Tool to begin cutting away small pieces of the background.
Click somewhere along the edge of your object, then add several more points while tracing its border. After adding about ten points—or when you reach the edge of the window—click somewhere away from the object and double-click to close the polygon, as shown below.
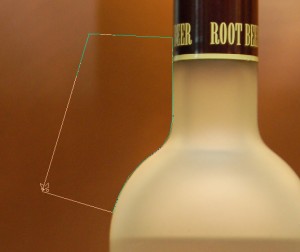
Press Alt+Backspace to fill the selected area with the foreground color, which should be black. If it isn't black, press D to reset the colors.
Pressing Ctrl+Backspace fills the selection with the background color instead.
Part of your image should now be transparent. Press Ctrl+D to deselect the area, then repeat the process until you have cut out the entire object.
For simple objects, it may be easier to select the whole object at once:
- Select the object.
- Press Ctrl+Shift+I to invert the selection.
- Press Alt+Backspace to fill the background with black.
- Press Ctrl+D to deselect it.
The downside to this approach is that a misplaced point can be difficult to correct because you cannot undo an individual point.
Don't worry about making your selections perfect. We will clean up the edges in the next step.
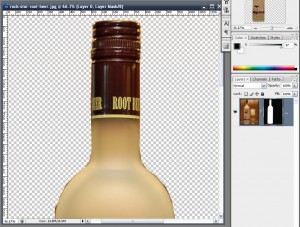
Step 8: Clean Up the Edges
Select the Brush Tool by pressing B, then set its hardness close to 100%.
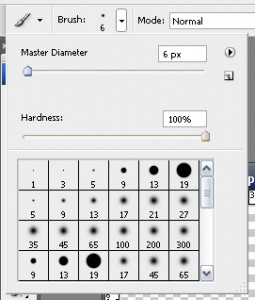
Make sure the layer mask is still selected and that your foreground color is black. Zoom in on the edges of your object and paint away any rough areas.
If you remove too much:
- Press Ctrl+Alt+Z to step backward through your edit history.
- Press Ctrl+Shift+Z to step forward.
- Press X to swap the foreground and background colors, then paint with white to restore part of the image.
Step 9: Round the Corners and Smooth the Edges
If the edges are too crisp or blurry, the corners are too sharp, or some of the original background remains visible, you can refine the mask.
First, click the chain icon between the image preview and the layer mask on Layer 0. This unlinks them so that changes to the mask do not affect the image itself.
Make sure the mask is still selected.
Contract the Mask
Hold Ctrl and click the mask thumbnail to convert it into a selection.
If some of the original background remains visible, go to:
Select > Modify > Contract
Choose a small value. Two or three pixels usually works well, although the correct value depends on how much background remains.
Press Ctrl+Shift+I to invert the selection, then fill it with black.
This step can also be compensated for when adjusting the mask levels.
Blur the Mask
Make sure the layer mask is highlighted and that nothing is selected. Then go to:
Filter > Blur > Gaussian Blur
The appropriate value depends on the size of the image and how rounded you want the corners to be, but approximately five pixels usually works well.
Don't worry if the result looks too blurry. We will correct that next.
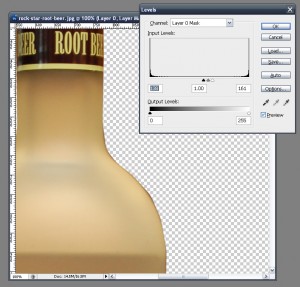
Adjust the Levels
Press Ctrl+L to open the Levels dialog.
You will see:
- A graph with sliders under Input Levels
- A black-to-white gradient under Output Levels
Drag the leftmost Input Levels slider toward the center. Then drag the rightmost slider toward the center as well.
Make sure Preview is enabled so you can see the changes. Adjust the sliders until the object has smooth, clean edges.
For more rounded corners, return to the Gaussian Blur step and use a larger radius.
That's it! You're done.
I hope you learned something useful from this tutorial, even if it was only a few keyboard shortcuts. Leave a comment below if you found it helpful. Your comments mean a lot and encourage me to write more tutorials in the future.