How to post a message to your Slack channel with cURL (from bash)

I’ll get straight to it. Here’s the code:


VERSION="$(hg log -r . -T'{node}')"
OVERLAY="${1:-staging}"
SLACK_CHANNEL=$([[ "$OVERLAY" == 'production' ]] && echo '#prod' || echo '#staging')
CHANGELOG=$(hg log -r "::$VERSION - ::tag('$OVERLAY') - user('$HG_USER') - merge()" -T '[{node|short}] {date|date}: {desc}\n' | tee /dev/tty)

IFS='' read -r -d '' SLACK_PAYLOAD <<'JSON'
{
    "channel": $channel,
    "blocks": [
        {
            "type": "section",
            "text": {
                "type": "mrkdwn",
                "text": $message
            }
        },
        {
            "type": "section",
            "text": {
                "type": "plain_text",
                "text": $changelog
            }
        }
    ]
}
JSON

SLACK_PAYLOAD=$(jq -nc \
    --arg channel "$SLACK_CHANNEL" \
    --arg message "Deployed \`$VERSION\` to $OVERLAY" \
    --arg changelog "${CHANGELOG:-No changes.}" \
    "$SLACK_PAYLOAD") || exit 4

curl -H "Content-type: application/json; charset=utf-8" \
    -sS \
    --data "$SLACK_PAYLOAD" \
    -H "Authorization: Bearer $SLACK_API_TOKEN" \
    -X POST 'https://slack.com/api/chat.postMessage' | jq -c

We’re using jq to properly format a JSON message here. Without it, there’s a high probability that the $changelog would break due to having line breaks and quotes in it; jq will take care of the escaping for us.

I’m using Mercurial (hg) here but you can swap our the commands for git if you prefer.

This sends a message like this to my Slack channel when ran:

I have this in my deploy script so everyone can see when something is deployed.

To get an API key, you can follow the first half of this tutorial: https://api.slack.com/tutorials/tracks/posting-messages-with-curl

How to optimize a website in 2018

Let’s start with caching. So many levels of caching.

Before we even get to your website, there’s the DNS. What IP does your domain point to? Usually your OS will cache this DNS lookup for you, failing that your DNS server (e.g. your ISP, 8.8.8.8 or 1.1.1.1) will. This isn’t usually something you need to worry about as a web-developer.

Next, the low-hanging fruit: CSS and JS. This is easy to cache. The content is static (rarely changes). We can easily set some HTTP headers via nginx or apache to cache these for a long time. But about when the content does change? Can we afford to wait a week or month before our customers’ browsers pick up the new copy? Can we ask them to press Ctrl+F5? This isn’t a good solution. The easiest and most robust way to handle this is to change the actual filename of the CSS and JS files. If the filename changes, the browser will be forced to download a new copy. Webpack can do this for you, but hooking up the generated filenames into your server-side templating language is a little bit trickier. Generally what it boils down to is using some kind of “webpack stats” plugin to spit out a JSON file listing all of your assets, then have you language of choice read this file and generate the necessary HTML. Not too bad.

Okay, but what about the HTML? Can we cache that too? That gets even harder. Usually the HTML contains data — information that changes frequently. Even if we tried to cache that, how would we cache-bust? Unlike CSS and JS, we can’t change the URL. What if we removed all of the data from the page, and just served templates? The page could run an AJAX request to pull in the data. Better yet, we can use a service worker so that our page loads, even when offline! We can check for new resources in the background and either load them when the user comes back, or encourage them to refresh at their convenience.

What about the data though? First we have to wait for the initial page to load before we can even send out our AJAX request? That’s not cool. Maybe HTTP/2 push can help here? Is it possible to cache the data? We can use IndexDB to store a local copy, and then sync any updates back to the server with Background Sync. But what about sensitive or shared data? We wouldn’t want to send all our data to the client. Even if we managed to send only the stuff they have access to, what would we do if their access is revoked? Too bad — all they have to do is turn-off wifi and they can keep using the app and accessing all the data thanks to PWA.

That’s about all the client-side caching we can do. What about the server though? Where does this data live? In a MySQL server? How long do those queries take? Can those be cached in memory? What if two users are requesting the exact same piece of information at the exact same time? Should we run the query twice? Can they be batched? What if one user is making many requests? Can we combine some of those HTTP requests? How do we know when the data becomes stale? Can we track mutations?

That’s it for caching. Now we have the perfect server setup, we’ve thought of everything, we have an infallible cache-busting strategy, our payloads are under 14KB, but our server just crashed. Oh-oh! I hope you have automatic fail-over. Serving static content from another server isn’t too hard, but data is kind of tricky. Keeping all our database servers in sync in real-time is hard enough, but database writes are even harder.

Oh, there’s also “critical path CSS”, “14KB packets”, optimizing JS for performance and parse time (size isn’t the only thing that’s important). We can put our JS into webworker threads to avoid blocking the main UI thread. Or we can rewrite all our JS in C and compile it to WebAssembly — but don’t do too much interop or you’ll negate the benefit (passing data back and forth isn’t free). What about when your web-app loses focus? Can we scale back some of the renders or network requests to play nice?

These are just some of the things off the top of my head that we as web-developers have to worry about when building a performant website today in 2018.

How to generate a deployment key for Bitbucket

  1. SSH into your server
  2. Run “ssh-keygen -t rsa” to generate a public and private key pair
  3. It will ask you where you to save the files.  I recommend “/root/.ssh/bitbucket”
  4. It will ask you to choose a passphrase. Since we’re just using this for deployments, you can leave the passphrase blank. If a hacker manages to steal these files, they probably have access to the code on your server anyway (which is all that this key will give them access to).
  5. Run “cat /root/.ssh/bitbucket.pub”. It will spit out your newly generated public key. Copy it to your clipboard.
  6. On bitbucket.org, go into your repo settings, click “Deployment keys” on the left and paste in your new key
  7. Run “nano /root/.hgrc”
  8. Add this to the file:
    [ui]
    ssh = ssh -i /root/.ssh/bitbucket
    
    [trusted]
    users = www-data
    
  9. cd into your project directory
  10. “hg clone ssh://[email protected]/NAME/PROJECT .” (The trailing dot clones into the current directory if you’ve already created it — make sure it’s empty or this won’t work)
  11. It should clone succesfully now. You can “hg pull && hg up –clean” whenever you like without any passwords. This might not be the most robust way to deploy, but it’s quick and easy.

Substitute “root” for your username if you SSH in as someone else.


Installing node-canvas on Windows

There’s an article here that describes the process, but it’s a bit vague in some areas and didn’t work for me.

If you’re on 64-bit Windows, you will need the 64-bit version of GTK which comes bundled with Cairo if you get the all-in-one package. Somewhere under the mile of text on this page you should find a link to it; here’s a direct link for version 2.22.

It’s a zip. Extract it to c:/GTK. I don’t even what to consider what’s involved making it work from a different location.

You also need node-gyp. Install it via

npm install -g node-gyp

Once you’ve got all the dependencies you can attempt to install node-canvas. “CD” into your project directory and then run

npm install canvas --msvs_version=2012

Adjust the version number for whatever version of Visual Studio you have. The Wiki says to use VC++ 2010 Express which is also a bitch to find on Microsoft’s website as they push you towards 2013. Here’s a direct link which may or not work.

Even after installing VS2010 though, npm/gyp wouldn’t pick it up automatically, which is why I had to specify the version manually. Even then 2010 didn’t work, but 2012 did, so, whatever.

If you get some linker errors, you probably have an old version of Cairo.

If you get something about cairo-features, it’s probably the same deal. Those can be fixed by opening the .sln in Visual Studio and updating the include dirs to include C:/GTK/includes/cairo, but then you’ll be left with a new error, and they’ll probably never end, so just try different versions of the GTK bundle until you find one that works. Maybe try 32-bit if the 64-bit one doesn’t work for you (32 didn’t work for me).

Selenium, PhantomJS, Node, Screenshots and Sizzle

Without going into too much detail, I just wanted to post a snippet of how to get all these technologies playing nicely together:

var webdriver = require('selenium-webdriver');
var fs = require('fs');

var driver = new webdriver.Builder()
    .withCapabilities(webdriver.Capabilities.phantomjs())
    .build();

webdriver.WebDriver.prototype.saveScreenshot = function(filename) {
    return driver.takeScreenshot().then(function(data) {
        fs.writeFile(filename, data.replace(/^data:image\/png;base64,/,''), 'base64', function(err) {
            if(err) throw err;
        });
    })
};

webdriver.By.sizzle = function(selector) {
    driver.executeScript("return typeof Sizzle==='undefined'").then(function(noSizzle) {
        if(noSizzle) driver.executeScript(fs.readFileSync('sizzle.min.js', {encoding: 'utf8'}));
    });
    return new webdriver.By.js("return Sizzle('"+selector.replace(/"/g,'\\"')+"')[0]");
};

driver.get('http://google.com/');
driver.findElement({sizzle:'input[name=q]'}).sendKeys('cheese\n');
driver.saveScreenshot('cheese.png');
driver.quit();

Node that you will need to start the Selenium server before you can run this example. Do so via:

java -jar selenium-server-standalone-2.35.0.jar


Two-way implicit casting

I’m presently writing a framework that wraps a C API using interop. Many of the classes/structs defined in the C library already exist in .NET, but I have to re-implement them anyway so that I can interface with the library. People accustomed to the .NET classes won’t be fond of this because they already have a set of classes that work well, and the new ones won’t work with existing .NET methods. There is a simple solution to this, however! Implicit casting!

Here’s a sample of how I made my Color struct compatible with the one defined in System.Drawing.Color:

[StructLayout(LayoutKind.Sequential)]
public struct Color
{
    public byte R, G, B, A;

    public static implicit operator System.Drawing.Color(Color c)
    {
        return System.Drawing.Color.FromArgb(c.A, c.R, c.G, c.B);
    }

    public static implicit operator Color(System.Drawing.Color c)
    {
        return new Color {R = c.R, G = c.G, B = c.B, A = c.A};
    }
}

Note that System.Drawing.Color uses ints instead of bytes for its colors, and they aren’t necessarily stored in the same memory location, so I couldn’t use that class directly. You can, however, convert back and forth between the two classes without any loss of data, so this is a perfect case for implicit casting. If the two classes aren’t convertible without some data changing, you should use explicit casting instead, or perhaps a static factory method.

I was curious, however, to know what would happen if an implicit casting method was defined in both classes. Here’s an example:

class A
{
    public static implicit operator B(A a)
    {
        Console.WriteLine("A::B");
        return new B();
    }
}

class B
{
    public static implicit operator B(A a)
    {
        Console.WriteLine("B::B");
        return new B();
    }
}

class Program
{
    public static void F(B b)
    {
        Console.WriteLine("F()");
    }

    static void Main(string[] args)
    {
        var a = new A();
        F(a);
        Console.ReadLine();
    }
}

How does it know which method to call? The answer: it doesn’t! This actually gives the following error:

Ambiguous user defined conversions ‘ImplicitTest.A.implicit operator ImplicitTest.B(ImplicitTest.A)’ and ‘ImplicitTest.B.implicit operator ImplicitTest.B(ImplicitTest.A)’ when converting from ‘ImplicitTest.A’ to ‘ImplicitTest.B’

There is a way you can still utilize one of conversion methods, but it isn’t pretty. Here’s the solution work-around:

static void Main(string[] args)
{
    var method = typeof (A).GetMethod("op_Implicit", new[] {typeof (A)});
    var converter = (Func<A, B>) Delegate.CreateDelegate(typeof (Func<A, B>), method);
    var a = new A();
    F(converter.Invoke(a));
    Console.ReadLine();
}

[credit]

The real solution would be to just delete one of the methods, if you can!

Posted in

Compile all Jade files to a single client-side JavaScript file

Jade is “a high performance template engine heavily influenced by Haml and implemented with JavaScript for node”.

One of it’s nice features is that it lets you compile your Jade templates into JavaScript functions which can be ran client-side. This is particularly useful when you want to pass JSON data back from an AJAX call and render it; it keeps you have from having to pass HTML “over the wire” or from writing complex JavaScript to rebuild your DOM elements. It’s also super fast.

After installing Jade, you can compile a single template via the command-line by running jade -c template.jade. This will generate a *.js file that looks like this:

function anonymous(locals, attrs, escape, rethrow, merge) {
    ...
}

Which is great, except that it’s just about unusable as-is. If you try including that to your page, you now have access to a single function called “anonymous” — not very helpful. The problem gets worse if you want to have access to more than one template.

Wouldn’t it be nicer if all of your templates got compiled to a single object with a sensible name, which you could use the access all your template functions? That’s why I wrote a script to compile all your Jade files into a single .js file that looks like this:

var Templates = {
"login":
  function anonymous(locals, attrs, escape, rethrow, merge) {
      ..
  },
"change_password":
  function anonymous(locals, attrs, escape, rethrow, merge) {
      ..
  }
};

Now you just need to include that Jade runtime plus this file that got generated via:

<script type="text/javascript" src="/js/jade/runtime.js"></script>
<script type="text/javascript" src="/js/templates.js"></script>

You can find runtime.js inside node_modules/jade after you install it.

Here’s the script:

var Jade = require('jade');
var FileSystem = require('fs');
var Path = require('path');
var _ = require('underscore');

var outName = 'public/js/templates.js';
var viewsDir = 'views';

files = FileSystem.readdirSync(viewsDir);
var templates = {};
files.forEach(function(filename) {
    if(/\.jade$/.test(filename)) {
        var name = Path.basename(filename, '.jade');
        var path = Path.join(viewsDir, filename);
        console.log('compiling', path);
        var fileContents = FileSystem.readFileSync(path, {encoding: 'utf8'});
        templates[name] = Jade.compile(fileContents, {
            debug: false,
            compileDebug: true,
            filename: path,
            client: true
        });
    }
});
console.log('writing', outName);

var properties = [];
_.each(templates, function(value, key) {
    properties.push(JSON.stringify(key) + ':\n  ' + value.toString());
});
var sourceCode = 'var Templates = {\n' + properties.join(',\n\n') + '\n};';

FileSystem.writeFile(outName, sourceCode);

I called mine “compile_jade.js”. You run it via “node compile_jade.js”. You will probably need to adjust your paths as necessary (see “outName” and “viewsDir” near the top). I will probably expand on this script in the future, but this should be enough to get you started with client-side Jade!

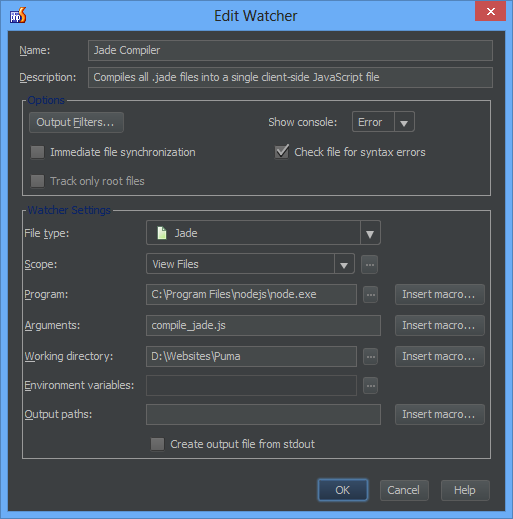
If you’re using PhpStorm or WebStorm like me, you can set up a File Watcher to watch your Jade files have it automatically re-run this script whenever you edit one of them:

jade-compiler

Meteor, Blade + Windows 8

Introductions

Meteor is a hot new Node-based web development framework.

Blade is a templating language based on Jade, which is a bit similar to Haml.

Windows 8 is an operating system that no one but me likes.

Installation

I’m assuming you’re already up and running with Node.

Meteor isn’t officially supported on Windows yet, so you have to install it a bit differently than suggested on their docs. Fortunately, someone has created an .msi installer for us. Run it.

If you haven’t done so,

npm install -g blade

. If “npm” isn’t a registered command, check your Start Screen for “Node.js Command Prompt” and use that instead of that standard

cmd.exe

. It should have all the paths set up correctly for you.

Now find your

npm/node_modules/blade

and

Meteor/packages

folders. Mine are located at

C:\Users\Mark\AppData\Roaming\npm\node_modules\blade

and

C:\Program Files (x86)\Meteor\packages

respectively.

Inside the

node_modules/blade

folder there should be another folder called “meteor”. Copy and paste this in-place to make a duplicate, then rename your copy to “blade”. We want to rename it before we move it because there is a folder in the meteor packages called “meteor” already. Now cut-and-paste your new folder into Meteor/packages.

Now go into

npm/node_modules/blade/lib

and copy all the files inside there into your newly created

Meteor/packages/blade

.

Now edit

Meteor/packages/blade/package.js

and change this line:


blade = require('../../packages/blade/node_modules/blade');

To point to the proper node module, e.g.,


blade = require('C:/Users/Mark/AppData/Roaming/npm/node_modules/blade');

That’s it.

Adding blade to your Meteor project

Just

cd

into your project folder and

meteor add blade

.

Usage is explained on the official Blade wiki.

(Sorry for the terrible formatting, those are supposed to be inline code blocks… I hate WordPress)

Find devices on your network

I have a NAS device on my network which has a web interface, but I didn’t know it’s IP. Running this simple command from cmd.exe gave me a handful of IPs to try which lead me to finding it very quickly:

arp -a

The results should look something like this:

C:\Users\Mark>arp -a

Interface: 192.168.0.12 --- 0xa
  Internet Address      Physical Address      Type
  192.168.0.1           78-cd-8e-7a-b5-f7     dynamic
  192.168.0.15          00-01-55-31-0c-29     dynamic
  192.168.0.17          1c-4b-d6-cf-e3-2d     dynamic
  192.168.0.255         ff-ff-ff-ff-ff-ff     static
  224.0.0.2             01-00-5e-00-00-02     static
  224.0.0.22            01-00-5e-00-00-16     static
  224.0.0.252           01-00-5e-00-00-fc     static
  225.0.0.1             01-00-5e-00-00-01     static
  230.0.0.3             01-00-5e-00-00-03     static
  239.255.255.250       01-00-5e-7f-ff-fa     static
  255.255.255.255       ff-ff-ff-ff-ff-ff     static

Interface: 192.168.56.1 --- 0xf
  Internet Address      Physical Address      Type
  192.168.56.255        ff-ff-ff-ff-ff-ff     static
  224.0.0.2             01-00-5e-00-00-02     static
  224.0.0.22            01-00-5e-00-00-16     static
  224.0.0.252           01-00-5e-00-00-fc     static
  225.0.0.1             01-00-5e-00-00-01     static
  239.255.255.250       01-00-5e-7f-ff-fa     static

It was one of the dynamic IPs; I’m not sure if that’s always the case.

WAMP: Apache won’t start/icon stays green

I have a non-standard installation of WAMP. I’ve installed it to my

Z:/wamp

. Recently it stopped working. All the suggestions I found on the web told me to check port 80, or check the

apache_error.log

but that didn’t help. I’ve already moved apache to port 81, and nothing was written to the log.

The solution was to open up a command prompt (

cmd.exe

),

cd

into the apache bin directory (

Z:\wamp\bin\apache\apache2.2.22\bin

for me), and run

httpd.exe

manually. As soon as I did that, it told me:

Syntax error on line 22 of Z:/wamp/bin/apache/apache2.2.22/conf/extra/httpd-auto index.conf:

&lt;Directory "c:/Apache2/icons"&gt;

path is invalid.

Which was an easy enough fix; just point it to

Z:/wamp\bin/apache/apache2.2.22/icons

. Bam! Works again. Just close out of the console and restart WAMP via the icon.

tl;dr If your apache won’t start, and the error log isn’t giving you any information, start it manually and check there if you get any error messages.

Edit: I know this blog post is formatted stupidly, I have to figure out what’s going on with WordPress.

Posted in