There are many ways to remove the background from an image in Photoshop. Today, I am going to show you my favorite method: using the lasso tool, layer masks, and a gaussian blur to soften the edges. This method probably isn’t the best for dealing with fuzzy edges like hair; I’ll cover that in another tutorial.
Estimated Time: 10 minutes
Skill Level Required: Absolute beginner
I will be assuming you’re using a PC/Windows; if you’re using a Mac, I believe you can substitute “Ctrl” for “Option”. I will be teaching you lots of hotkeys which can be a big time-saver in the long run.
Before/After

Step 1 – open your image
Open your image in Photoshop. I’ll be using this image of Root Beer flavored vodka in Photoshop CS3.
Step 2 – change background to normal layer
If the layer says Background (in italics), double click it and just “OK” in the dialog that pops up. Otherwise, you won’t have a transparent background.
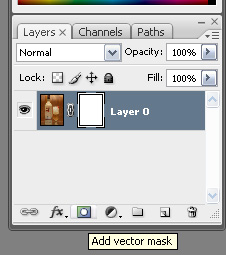
Step 3 – add a vector mask
Click the Add Vector Mask button under the layers panel. This will allow you to hide parts of the image, but bring them back if you subtract too much (whereas the eraser tool is permanent).
Step 4 – reset colors
Press D to reset foreground/background colors to black and white, respectively. This will be important when we start painting on the vector mask. Black means that part of the image is hidden/transparent, white means it’s opaque, and grays represent various degrees of transparency.
Step 5 – select polygonal lasso tool
Select the Polygonal Lasso Tool (L). You may need to click and hold the regular Lasso Tool (near the top of the toolbox) to activate a pop-up menu.
Step 6 – click the layer mask
Click on the layer mask you added earlier. It’s the (black and) white image preview on Layer 0. You don’t want to be painting over your image, just the mask!
Step 7 – start cutting away the image
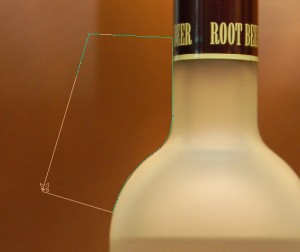
Zoom in (Ctrl =) a bit if you need to, then use the the polygonal tool to start cutting away small pieces of the image. Click somewhere on edge of your object, then add a few more points, tracing its border. After you’ve added about 10 points, or reach the end of the window, click somewhere away from your object, then double-click to close off your polygon (as shown below).
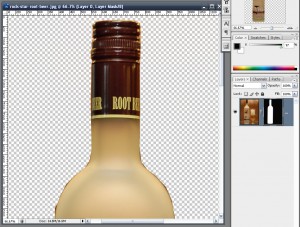
Press Alt Backspace to fill this area in with the foreground color (which should be black – if not, you’ve missed a step, press D). Ctrl Backspace will fill with the background color. Part of your image should now be transparent. Press Ctrl D to get rid of your selection, and repeat the process until you’ve cut out your object.
If you’re trying to cut out a really simple object, it might actually be easier just to select the whole object in one go, then press Ctrl Shift I to invert your selection, then press Alt Backspace and Ctrl D like usual. The downside to this method is that if you misclick, it can be hard to correct (you can’t undo a single point).
Don’t worry about making your selections perfect! I will be teaching you how to touch it up the next step.
Step 8 – clean up
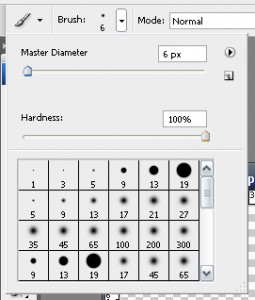
Select the Brush Tool (B), and set its hardness near 100%.
Make sure you’re still on the vector mask, and your foreground color is black. Zoom in to the edges of your object, and start painting away the rough bits. If you cut away too much, you can press Ctrl Shift Z to “Step Background”. Photoshop only allows one undo, so repeatedly pressly Ctrl Z won’t do you much good. Alt Ctrl Z is Step Forward. You can also press X to swap your foreground and background colors, and then use white to paint back some of your image.
Step 9 – round the corners, and crisp the edges
If the edges of your object are too crisp, too blurry, the corners are too sharp, or you can still see some background around your object, there’s a way to fix that!
First, click the little chain icon on Layer 0, between the preview and layer mask. This will unlink them so that when we apply a blur to the mask, it won’t affect the image. Make sure the mask is still selected. Ctrl Click the mask to turn it into a selection.
If you can still see some background around your object, go Select > Modify > Contract and choose a small value. Usually 2 or 3 pixels works well, but it depends on how much background you left behind! Press Ctrl Shift I to invert your selection, and fill it with black. This (sub)step can also be compensated for in the next one.
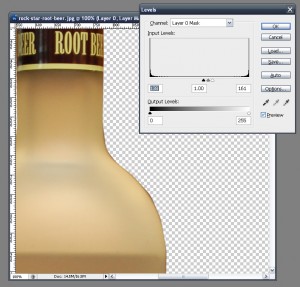
Make sure the vector mask is still highlighted, and you have no selections. Go to Filter > Blur > Gaussian Blur. Depending on the size of your image, and how round you want the corners to be, you may want to use different values, but generally about 5 pixels works well. Don’t worry about how blurry it looks, we’re going to fix that. Press Ctrl L to bring up the Levels dialog. You will see a graph with some sliders under Input Levels, and a black to white gradient Output Levels. Grab the left-most slider under Input Levels and drag it near the middle, then grab the right-most slider and also drag it near the middle. Make sure Preview is checked so that you can see what’s going on. Move them around until you have nice smooth edges around your object. If you want your corners more rounded, you might want to go back and use a bigger blur.
That’s it! You’re done. I hope you learned a thing or two from this tutorial, if only a few hotkeys. Leave a comment below if you liked it. Your comments really mean a lot and will encourage me to write more for you in the future.


7 thoughts on “Cut out an Image w/ Lasso Tool, Layer Masks and Gaussian Blur”
Many thanks – this was really helpful for a complete novice like me 🙂
Susie
thanks for the tutorial, but you have not finished it, you’ve done part of one image that is “before ” where is “after”
ali
Hi Ali,
Both the before an after shots can be seen in the first image. Now that I look at it again though, I could have spent a bit more time on it 🙂 I think the technique I suggest here is best suited for objects with hard edges; it won’t work as well with “fluffy” or hairy objects.
Mark
Hi Mark,
Thanks for the tutorial but like Ali I am wondering how you fill in the background with a new image. If you could tell me the last step for this I would be most grateful. Thanks
Lewis
@Lewis: Once your background is transparent, it’s simply a matter of creating a new layer below and pasting in your background image. You may want to take a look at this tutorial (http://www.photoshopcafe.com/tutorials/layers/intro.htm) if you’re unfamiliar with the concept of layers.
Mark
Your tutorial was very helpful and your way of expression and the best part was that you used an image to show us how to work with it … May be that’s what makes you a professional.
ashr
how we get a new or different backround in from there and also how does one take out the backround through a window??
juan